The PC case and power supply unit (PSU)
The following webpage provides images of the connectors that a modern power supply unit provides.
All about the various PC power supply cables and connectors –
http://www.playtool.com/pages/psuconnectors/connectors.html
Since the case houses the computer’s components, it is an important consideration. Cases can be purchased for as little as £15, but if it comes with a power supply unit, it will be a cheap make that you would be better off not using because cheap power supplies tend to fail and when they fail they can destroy the rest of the computer’s components. A low-quality power supply can take out the other components when it fails and can be a fire hazard, so the power supply is certainly not a component that can be neglected. If you want to read it now, go back to the first page of this article and look through the Index of Contents to find the link to information on power supply units (PSUs).
Even reputable case manufactures, such as Foxconn, and PC manufacturers, such as Advent, are using cheap power supplies in some of their cases and PCs.
I repeat, if you buy a case that has a cheap power supply, you should replace it immediately, because cheap power supplies as well as being a danger to the other components are known to have been the cause of fires. The power supply itself will identify its make and model, so, to find out what it is, open the case and have a look. You can then conduct a web search for the make/model. If there is no such information, replace the power supply with a reputable model.
Cheap cases also tend to have sharp edges that can cut you when you are installing the components. They have thin walls that won’t insulate the sound of the internal fans well. Make sure that the case has all of the room you need to install all of the components that you plan to install. Room for the graphics card(s), hard drives, etc.
If you want to build a mini PC, you have to buy a special small case called a mini-tower (micro-ATX) or mini-ITX case that can only take a micro-ATX or mini-ITX form-factor motherboard. If you want to build a really small PC, you need what is called a barebones case. The mini-ITX and micro-ATX cases and motherboards meet the needs for PCs in small spaces
The main form-factor motherboards in use are full ATX and micro-ATX that are fitted into mini-tower (aka micro-ATX), midi-tower and full-tower ATX cases. Both full ATX and micro-ATX motherboards are powered by ATX power supply units (PSUs).
Micro-ATX motherboards are smaller than full-sized ATX motherboards and so cannot provide as many adapter-card or RAM-memory slots, can be installed in any ATX case, but are usually installed in mini-tower ATX cases. A full-sized ATX motherboard is too large to be installed in a mini-tower (micro-ATX) case.
If you want to build a media center PC for your lounge, you need a Home Theater PC (HTPC) case, which are available in a range of sizes. Full-size cases are conspicuous and accommodate standard motherboards and components and have plenty of room for hard disk drives, etc. Small HTPC cases look like any other hi-fi component. They are not as conspicuous as the full-size cases, but their small size means that they use laptop-size optical CD/DVD/Blu-ray drives and don’t have much room for additional components.
The current standard ATX cases come in a variety of designs. Cheap cases are usually opened by removing four screws at the back of the case that allow you to remove the side panels. Some cases require that the whole plastic front, which clips on, is removed to reveal the screws that allow the side panels to be removed. Other types are designed for tool-free access, such as the cases made by Akasa. Thumbscrews that can be removed by hand can be used instead of screws that require the use of a screwdriver and the drive bays can be removable. Some cases come with a power supply included, some do not, so, if you don’t want to buy a power supply, make sure that the case you choose comes with a quality unit. A cheap case will often come with an unsuitable, cheap power supply that you should replace with a unit of suitable quality and maximum power output.
Watch the following video to see the problems an experienced technician has with a relatively cheap case. The design of the case is bad, so the cable management is somewhat nightmarish.
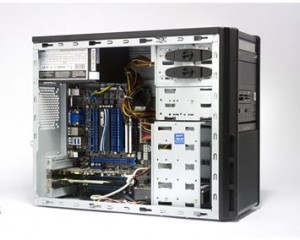
Note the small size of the ATX power supply unit in the top left hand corner of the midi-tower ATX case shown below. In some cases, the power supply is installed in the bottom corner of the case.
You may have to buy a mains cable if one didn’t come with the case. If you bought a case without a power supply unit, a new power supply unit will come with a mains connector. Of course, a new desktop PC comes with all of the cables it requires.
A well-designed case provides the holes that can be used to route the cables under the tray that the motherboard is fitted to and away from the fans. In a brand-name case you will find the cables tied together and routed in order to leave as much free space inside the case as possible, which makes the efficient flow of air inside the case help keep the components cool – even the processor with its own cooling unit. You should do likewise when building your own PC. The case fans should never fight each other; should always make air flow in at the front and flow out at the back of the case.
The higher the performance that a PC is built for, the more important cable management becomes as a build consideration.
How to cable manage your PC like a PRO! –
Some cases are designed for silence by providing sound-isolating foam on the side panels, which can trap heat inside the case and make it necessary to add additional fans. The best-quality cases have sound-damping that can be replaced with additional fans if required.
Big, light power supply units are almost always cheap and should be replaced. The capacitors used in a power supply of quality are heavy therefore it is relatively heavy for its size and always small, and, as such, will allow unhindered access to the motherboard, which is fitted close to the unopened side on a tray that slides into place and which is secured by screws.
The image below shows the back view of the ATX case shown above. The blue analog VGA port means that the motherboard has an integrated graphics chip, so a dedicated graphics card is not necessary, but can still be installed in the free blue PCI Express x16 slot, which can be seen in the image above showing the case opened. If installed, the ports of a PCI Express graphics card would appear in the top unoccupied slot just above the backplate of the PCI sound card with its round ports. Under the sound card is a wireless network card with its two antennas. The motherboard’s built-in graphics chip is connected to a monitor by using the central blue VGA port in the ports panel. The power supply unit is at the top above the ports panel and air vent.
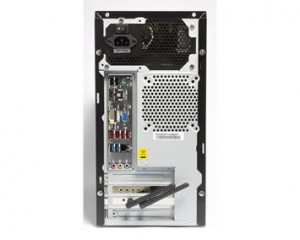
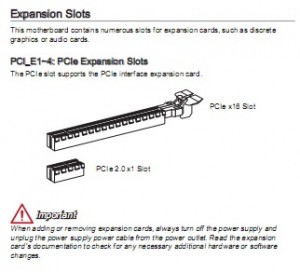
Note well that although a high-end graphics card, such as the AMD Radeon HD 6990 card shown below, uses only a single PCI Express x16 slot, it uses up the space of two slots. In the ATX case above, the top horizontal slot is a PCI Express x16 slot and the slot beside it is a PCI slot with a sound card installed in it (the round ports are sound card ports). The three bottom slots all appear to be PCI slots, so you would have to leave the PCI slot under the PCI Express slot free in order to install that graphics card, which is described in its specifications as follows on AMD’s website: “PCI Express based PC is required with one X16 lane graphics slot available on the motherboard.”

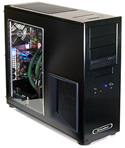
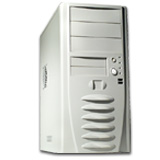
The image below shows the front view of an Antec SLK1650 ATX case. You can see the power-on and reset buttons and the two 3.5-inch drive bays for devices such as a floppy disk drive, only available new now in the form of external USB drives. Above them are three 5.25-inch bays for optical drives (CD/DVD/Blu-ray).
It is difficult for non-specialist people to determine the quality of a particular power supply unless they rely on brand names of the manufacturers that are known to produce quality units, such as Antec, Enermax, Corsair, Cooler Master, etc. But the well-known manufacturers are not the only producers of quality power supplies. There are many relatively unknown manufacturers that produce units of quality.
Moreover, a poor-quality power supply doesn’t have to be large, it could also be as small as a high-quality unit. So, a good rule of thumb to use is this – better quality power supplies tend to be heavier than those of lower quality. If you take the power supply out of the case and weigh it, it should not weigh less than between 3 and 4lbs (1.5kg), otherwise it is probably not adequate to meet the requirements of a modern system.
If you buy a case that is cheap, it will almost certainly contain a cheap power supply unit, so never spend less than about £50/$80 on a case that has a power supply installed in it and if it is a cheap case with a power supply, search for reviews of the make/model of the power supply. (Cases that don’t come with a power supply unit can be purchased.) As is the case with the RAM memory, spending as much as you can afford on a quality case could save you time locating the cause of problems and probably a small fortune in repair costs in the long run.
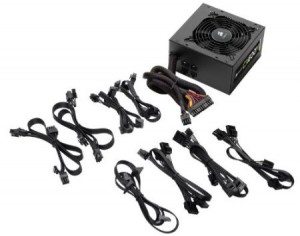
The image below shows a Corsair Builder Series CXM 600W Modular 80 PLUS Bronze Certified ATX/EPS power supply unit (PSU) that was priced at £56 on amazon.co.uk in December 2014. It provides 600W of power and its modular design means that it comes with individual cables, shown in the image, that are added to the power supply as needed instead of all being part of the unit that cannot be removed and take up space in the case. It had 979+ purchaser reviews, 730 of which were given five stars, and 42 answered questions, so it must be pretty good.
The installation of a power supply is simple – place it in the place where it fits in the case, screw it in and then connect the cables to the motherboard, storage drive(s) (hard drive(s) and/or SSD drive(s), optical CD/DVD/Blu-ray disc drive(s), processor and graphics card, if required. The processor requires additional power directly from the power supply and a high-end graphics card does as well. The link to a video below shows the basic installation of a 750W model. You have to know exactly which cable to use and exactly where to plug it in. To find out that information requires reading the motherboard’s user manual and the installation instructions of each of the components – drives, processor, graphics card, etc.
Corsair CX750M Power Supply Unboxing and Installation (Modular) –
Next page: The PC case is a neglected component