Control device driver installation by disabling driver signature enforcement in Windows 8.1/10

Device drivers digitally signed by Windows Hardware Quality Labs
For security purposes, Windows 8.1 and 10 do not permit device driver installation unless the drivers have been tested and given digital signatures by Windows Hardware Quality Labs (WHQL). This prevents malware installation via device driver installation.
If passed, WHQL gives device drivers digital signatures that Windows can read.
This is a nuisance if you can’t get a particular device working, such as a graphics card, because there are no drivers with the signatures that Windows 8.1/10 requires.
Note well that, for security reasons, you must only test install unsigned drivers for Win8.1/10 that come from a trustworthy source. Untrustworthy drivers can install malware.
Fortunately, the 64-bit versions of Windows 8.1/10 that most computers bought new use, provide ways of disabling driver signature enforcement so that you can install drivers that have not been tested and digitally signed for Windows 8.1/10.
Disable Secure Boot setting in the UEFI BIOS
The Secure Boot option of a UEFI BIOS setup activates by default as a security measure. Disable Secure Boot first.
Note that if your computer is using an old standard legacy BIOS, Secure Boot is not used.
The UEFI BIOS checks that the boot loader for Windows or another operating system is digitally signed by Microsoft before it allows system startup. It also won’t boot the system with unsigned drivers. The UEFI BIOS varies from computer to computer, so consult the desktop or laptop PC’s motherboard manufacturer’s user manual that its support website provides to find out about it or open the UEFI by pressing its entry key (F1, Del, etc.) and searching through the settings for Secure Boot (Enable/disable).
Use a Command Prompt – run as Administrator – to disable driver signature enforcement
There are separate Command Prompt commands that disable and re-enable driver signature enforcement.
To open a Command Prompt, press the Windows key (the one with a Windows flag on it) plus the X key and choose “Command Prompt (Admin)”.
Entering bcdedit /set testsigning on at the Command Prompt disables signature enforcement, enables Test Mode. You have to restart the computer to enter test mode and install one or more unsigned drivers. A Test Mode watermark appears in the bottom right corner of the desktop screen.
Entering bcdedit /set testsigning off at the Command Prompt turns Test Mode off.
The temporary way to turn off driver signature enforcement
There is a temporary way to turn off driver signature enforcement. You just have to get to the Startup Settings and enable the setting called “Disable driver signature enforcement”. Windows turns off that setting the next time it restarts. Here is how to get to the Startup Settings.
Hold down the Shift key while you click the “Restart” option in Windows
Hold down the Shift key and click the “Restart” option in Windows. Your computer will restart into the startup options menu that has “Choose an Option” as its title.
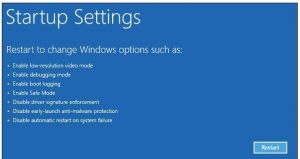
Choose the “Troubleshoot” option, followed by “Advanced options” => “Startup Settings”.
Clicking “Restart” restarts into the Startup Settings screen. The image below shows the Startup Settings options.

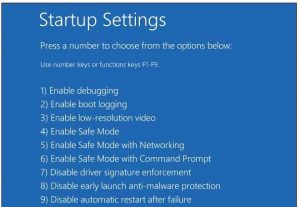
Type “7” or “F7” at the Startup Settings screen to activate the “Disable driver signature enforcement” option. The image below shows the Startup Settings screen.

You can then install any unsigned driver(s) of your choosing. However, remember that driver signature enforcement will be re-enabled the next time the computer restarts.
If you want to use the unsigned driver(s), you have to go through the process again. That is why using the Command Prompt method is the best option. You choose when to disable it, not Windows.